
BioEngineering NLF22 Fermentor Quick Start Guide
UCLA-DOE Institute for Genomics & Proteomics
Protein Expression Technology Center
Note: This is not a substitute for reading the actual manual!
- Pre-sterilization
You will need to:
- Calibrate the pH probe.
- Insert septums into the appropriate number of ports on the head plate.
- Polarize and calibrate the DO probe.
- Add media and adjust the level of the antifoam probe.
- Perform a pressure hold test
1-1. pH probe calibration
Note: The pH probe should be stored in 3 M KCl when not in use.
Remove pH probe from storage beaker.
Attach the probe to the IFM controller using the appropriate lead.
Insert probe in pH buffer pH 7.0. Make sure that the membrane on the side of the probe is covered by the buffer.
Allow to equilibrate.
Go to calibration menu on IFM controller.
Select calibration measurement.
Set first setpoint (pH 7.0).
Select calibrate and press ok.
Move probe to second pH buffer (usually 4.0 or 10.0 depending on desired media pH). Make sure that the membrane on the side of the probe is covered by the buffer.
Allow to equilibrate.
Enter second setpoint.
Select calibrate and press ok.
The readout on the screen should say “calibration done”
At this point the probe is ready to use. The pH probe is to be screwed into a connector that is fitted into the base of the fermentor. The proper connector is 31913.2. Until placed in the vessel you should keep the probe submersed in buffer that has some ionic strength. Storing the probe in distilled water will shorten its useable lifespan.
Note: For really accurate calibration it is a good idea to stir your pH buffer solution to ensure proper calibration.
1-2. Septum preparation
Decide how many ports on the headplate you will be using, i.e. acid, base, antifoam, nutrient feed, inoculation. Remove the stopper and place a septum in the port. Screw a “cup” in place above it and then add a “stopper” to ensure that the port is sealed. If the septum is not needed in your fermentation it can be reused without replacing it.
Note: any reagent that will be fed into the fermentor should be sterilized in the autoclave. You would want to put some tygon tubing into a bottle containing the solution and then attach the tubing to an injection needle. The injection needle can be covered with aluminum foil for autoclaving.
1-3. DO probe preparation
The DO probe needs to be polarized for 6 hours prior to use to be accurate. This means that it should be plugged into the DO IFM controller and the fermentor unit should be turned on. The DO probe can be stored dry for 6 months at which point the electrolyte solution inside should be changed. The protective caps (red plastic and green plastic) should be on the probe to protect it during storage. The DO probe is to be screwed into a connector that is fitted into the base of the fermentor. The proper connector is 31913.1.
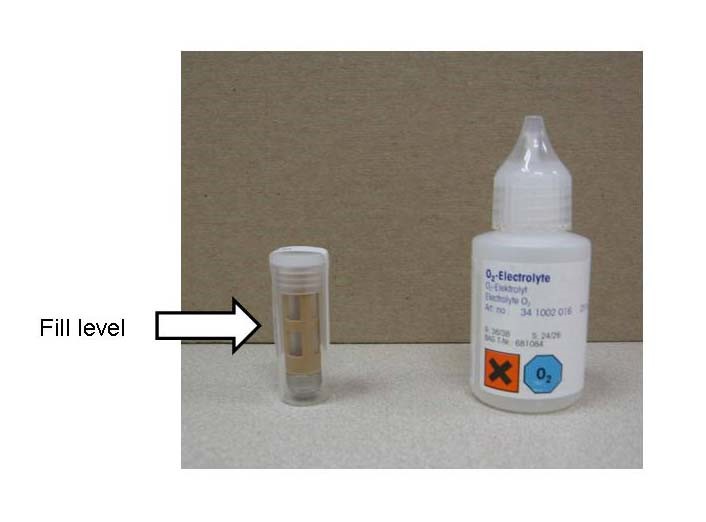
The figure below shows the electrolyte for the probe and the membrane assembly (in a protective case). The membrane assembly can be removed, filled halfway with electrolyte, and then placed over the tip of the probe. The metal cap then screws in place over the membrane assembly to protect the probe/membrane assembly. Note: the membrane assembly is a single piece and should not be disassembled. To remove the membrane assembly and refill with electrolyte do the following: remove the steel sleeve from the probe, use the pad of your finger to gently push the membrane assembly out of the sleeve, wipe off the electrode, fill the membrane assembly half full, replace the membrane assembly over the electrode tip, wipe off excess electrolyte (there shouldn’t be any electrolyte between the membrane assembly and the sleeve), replace the sleeve.
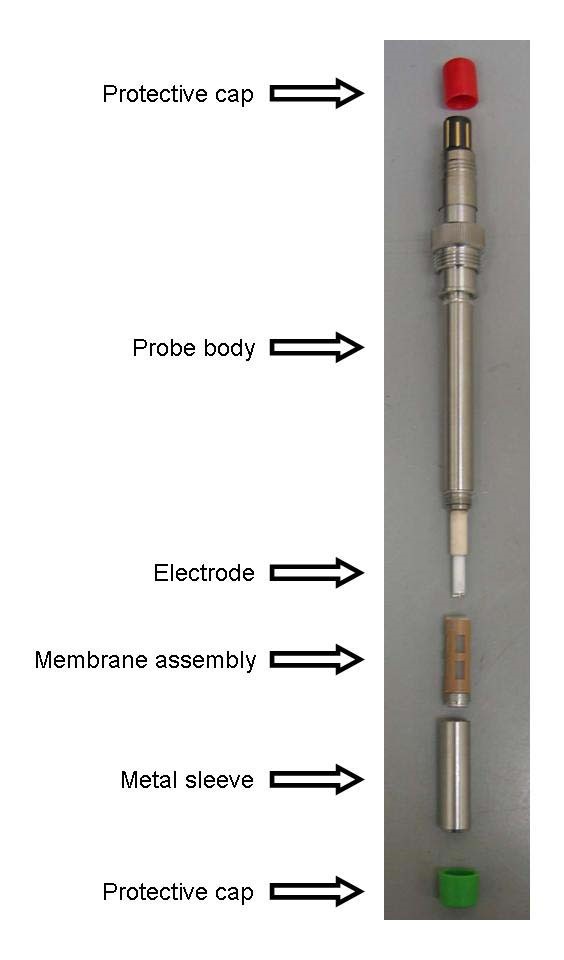
The picture below shows (from top to bottom): protective cover for electrical connection, the probe, the membrane assembly, the protective sleeve for the membrane assembly, and the protective cover for the probe when it is not in use.
DO probe calibration
There is a one point and two point calibration. The one point calibration is fine for normal use but if you plan to measure small changes in DO then you should use the two point calibration for greater accuracy.
One point calibration:
- Set the agitation and air flow as you would have them for the fermentation. Allow the system to equilibrate (5-10 minutes).
- Go to Calibration screen.
- Select “CALIB.MEAS”. Hit ok.
- Select “2.REF.ONLY” Hit ok.
- Once reading has stabilized select “CALIBRATE” and hit ok.
- The calibration is done.
1-4. Temperature probe preparation
The temperature probe is permanently installed in the instrument and is verified on an annual operation using a hand-held Infrared Digital Thermometer gun with laser pointer Measuring Tool.
1-5. Motor Speed.
The correct calibration of the motor is verified during the annual inspection using a hand-held Handheld Digital Laser Photo Tachometer RPM Tach Small Engine Motor Speed Gauge.
1-6. Pressure hold test
This isn’t strictly necessary but it may be a good idea to check. Pressurize the vessel and verify that the sealed vessel can hold a pressure of ~1-1.5 bar for 15-30 minutes.
1-7. Drive coupling inspection
If the fermentor has not been used for a long time then the mechanical seal may stick. In this case turn the drive coupling manually prior to starting the agitation.
1-8. Antifoam probe preparation
The antifoam probe does not require much attention. Once you have added your media adjust the probe so that it is above the level of your media.
1-9. Media addition
It is probably easiest to make a concentrated solution that contains the media components. Pouring powder through a funnel into the vessel is not really advisable as you will most likely make a mess that you will have to clean up. Pour the concentrated media and distilled water to dilute it through a port in the headplate using a funnel. Replace the stopper afterwards. Expect to lose ~10% of the volume during sterilization so add an additional 10% volume in water to the fermentor.
- Sterilization
- Make sure that the pH and DO probes are in place if you are using them.
- Fill fermentor with appropriate amount of media.
- Turn on the main power supply for the fermentor and chiller. If you are using the DO probe then you should have had the power on for at least 6 hours prior to starting the sterilization process to ensure that the DO probe is polarized.
- Turn on the tap water and open the appropriate valve for the fermentor that you are using.
- Open the main chiller valve and the appropriate valve for the fermentor that you are using.
- Turn on the cold water line(s).
- Open the compressed air valve for the fermentor that you’re using. Set the airflow to 10 nl/minute using the IFM flow controller. The air will not be entering the vessel during sterilization so it can be turned on after the vessel has cooled to the working temperature.
- Set the stir speed to 150 rpm using the IFM speed controller.
- NOTE: If the fermentor has not been used for a long time then the mechanical seal may stick. In this case turn the drive coupling manually prior to starting the agitation.
- Set your fermentation temperature using the IFM temperature controller. This is the temperature that the fermentor will cool to post-sterilization.
- Fermentor valves:
- Close the valve on the top (360).
- Close valves 367, 431.
- Valves 417, 453, and 363 should be open.
- Set the fermentor to sterilize using the IFM temperature controller. The fermentor will begin heating at this point.
- Once the fermentor temperature reaches 95°C (will take ~ 35 minutes) you will be prompted to close valve 417. Once the valve is closed hit OK on the IFM controller.
- The fermentor will heat to 121°C and will then hold that temperature for 60 minutes. The pressure in the fermentor should be ~1 bar.
- After the 20 minute sterilization the fermentor will begin cooling. Once it reaches ~95-100°C you will be prompted to open valve 417. Once the valve is open hit OK on the IFM controller.
- At this point you can close valves 363 and 453 and open 360 and 367 to speed cooling by introducing airflow into the fermentor. However, in our initial test runs we have noticed that the media level in the fementor drops by ~7% when we open all the valves when the temperature is still very high. It may that we’re venting a considerable amount of media as steam. So, it may be a good idea to cool the fermentor using the chiller before opening these valves although opening valve 431 which puts chilled water into the condenser may be a good idea.
- Note: To prevent introduction of insterile air to the fermentor use the following sequence: Turn on air supply and set flow rate with IFM to 10 nl/min, open valve 367, open valve 360, close valve 363.
- Once the fermentor has cooled and the valves have been put in proper positions the fermentor is ready to use.
Note: it will take ~2.5 hours to go through the whole sterilization process (i.e. from RT to 121°C and then back to 37°C).
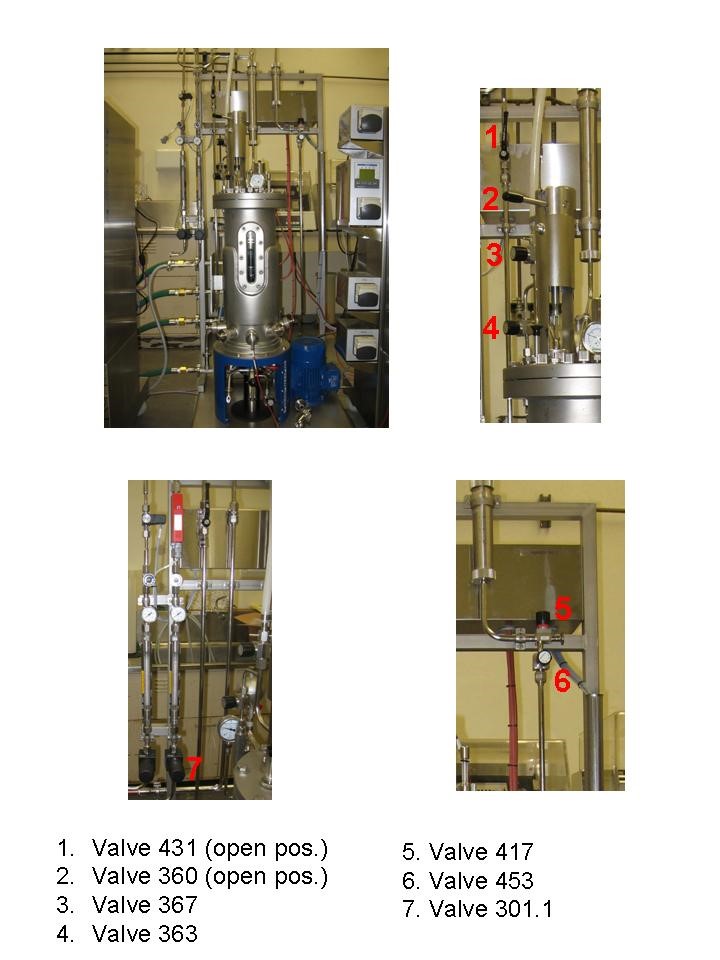
This figure shows the relevant valves on the NLF22. The fermentor may, or may not, have an automated flow controller installed (the red box in the bottom left image). If the flow controller is installed then the air flow is regulated using an IFM controller. If it is not installed then the air flow rate can be manually adjusted using Valve 301.1 and the rotameter.
- Fermentation
General
Chilled and tap water should be on and the appropriate main valves open.
The compressor should be on as should the main air valve on the manifold. The rotameter should be around 1.5 bar. There shouldn’t be any signs of moisture in the rotameter. If there is then the compressor trap will need to be checked.
On the fermentor itself valves 360, 367, 431, 453 should be open. Valve 417 should be open to keep the pressure in the fermentor low. If you want to build up some pressure in the fermentor to reduce foaming than you can close this valve a little.
How you want to inoculate is your own business. The recommended way is to remove the stopper above a septum, pour ethanol on top of the septum, set it on fire and then plunge the inoculation needle through it. We are typically growing bacteria in the presence of selective agents (e.g. antibiotics) so we usually just open a plug on the top of the fermentor and inoculate through it.
- Post-run cleanup
The fermentor should be drained via the port ono the bottom of the cell cultutre media. Post drainage the fermentor should be filled with ~12L of water. Set agitation to 750 rpm and air flow to 30 nL/min. Stir 3 minutes and then drain the fermentor. Repeat twice and then fill the fermentor to the 12L mark and run a standard sterilization cycle.
- General notes
Miscellaneous valves
The ball valve is always open and the screw cap on the top should be only loosely screwed in.
The valves in the back on the bottom (210) for monitoring the pressure of incoming tap water are preset and do not need to be adjusted.
Settings
We have been using agitation rates of 300-400 rpm and air flow of 10 nL/min. This seems to be fine for typical E. coli protein expression.
Maintenance
- The glycerol that lubricates the mechanical seal should be checked weekly. The glycerol solution is 85% (diluted with water). The level should be just below the refill tube inside the reservoir.
- The seals should be checked after 30 runs or so.
- The ceramic filters should be checked after 10 runs. It will probably be fine but it’s wise to check it anyway.